

Make these stunning salt fireworks for an easy Fourth of July craft! This easy kids’ craft uses glue, salt, and watercolors to create a magical color-diffusing effect that looks just like a real firework bursting in the night sky.
- The perfect Fourth of July Craft for kids of every age
- Why salt and watercolor make such a magical combination for this Fourth of July craft
- Materials needed
- Step 1 Draw your firework shapes with glue
- Step 2 Cover with salt
- Step 3 Load up your watercolors
- Step 4 Tap and watch the magic happen
- Tips for the best results for this Fourth of July craft
- Why this Fourth of July craft works so well
- Frequently Asked Questions
The perfect Fourth of July Craft for kids of every age
The way my jaw dropped when I started making these.
I had seen this activity done here and there over the years and now I wish I had tried it sooner!
Salt fireworks are genuinely hard to mess up, which makes them ideal for a mixed-age crowd.Toddlers can dump salt with wild abandon. Elementary-age kids can draw the glue shapes and choose their colors. Older kids and teens can take full creative control and experiment with layering and blending.
Even adults find the process meditative.
It’s also a great way to keep little hands busy in the hours before the real fireworks start.
✨ Check out our ultimate collection of the best process art projects for kids!
Why salt and watercolor make such a magical combination for this Fourth of July craft
Here’s the cool part: this craft is actually a little bit of science.
When you pour salt onto wet glue, each tiny crystal sticks in place and creates a textured, porous surface. That texture is what makes the color magic happen. When a drop of watery watercolor lands on the salt, capillary action pulls the pigment along the crystals, spreading and diffusing outward from the drop in a perfect starburst.
The black paper plays a big role, too. It acts like a night sky, making every color pop with maximum contrast. Reds look vivid, blues look electric, and a little gold or yellow reads just like a spark.
The end result isn’t just a craft project but rather it’s a piece of art that genuinely looks like fireworks frozen mid-burst.

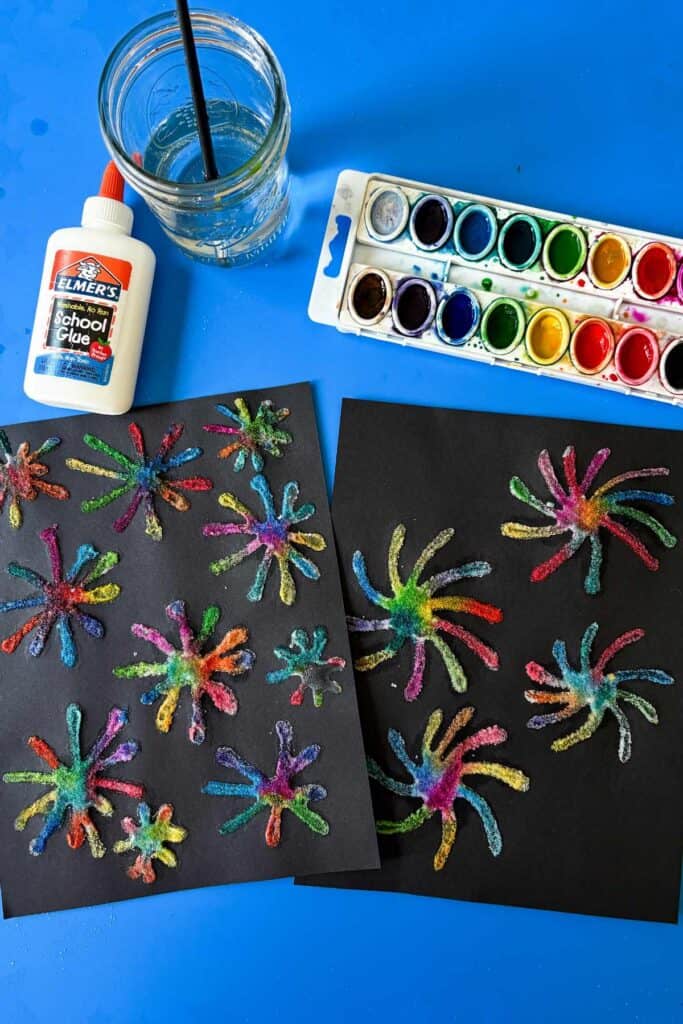
Materials needed
- Black cardstock or black construction paper
- White school glue (Elmer’s works great)
- Table salt
- Watercolor paints
- Paintbrush
- Water
- A tray or baking sheet (to catch the salt)


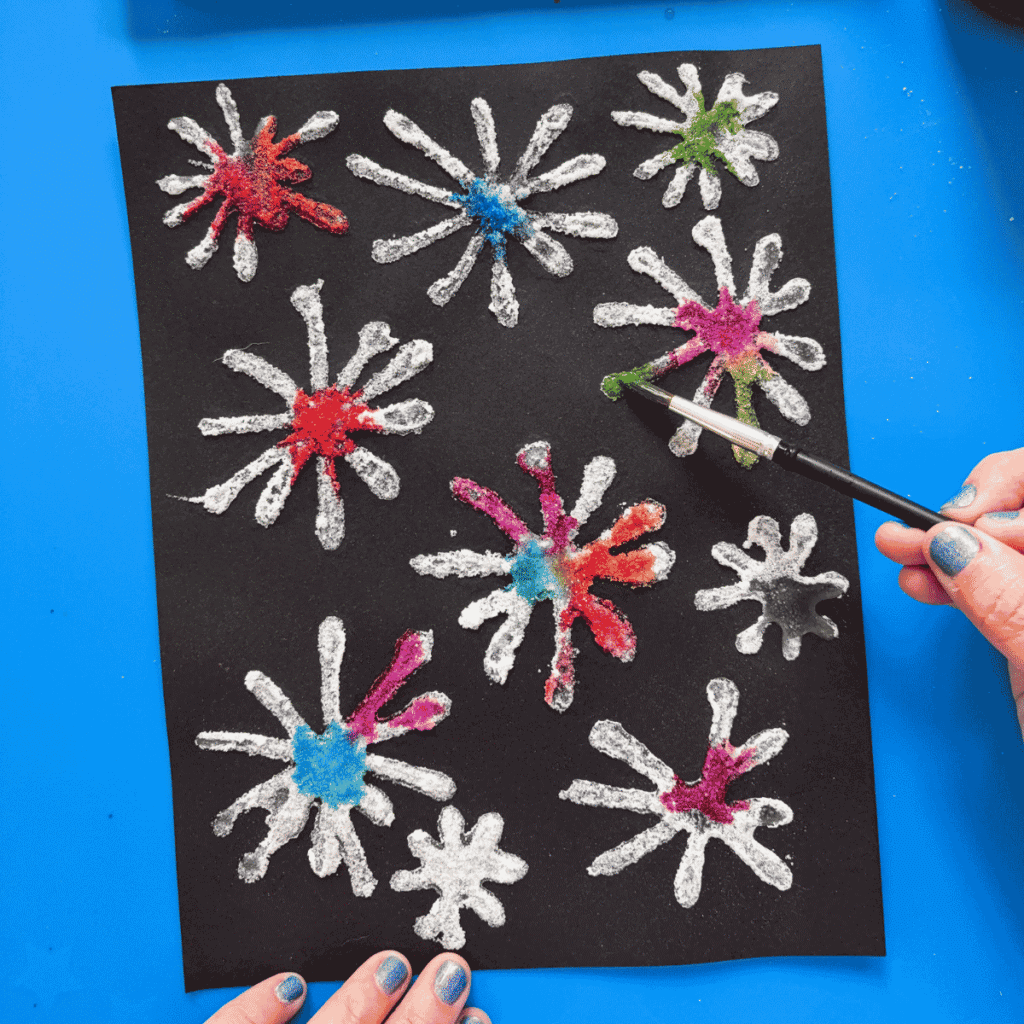
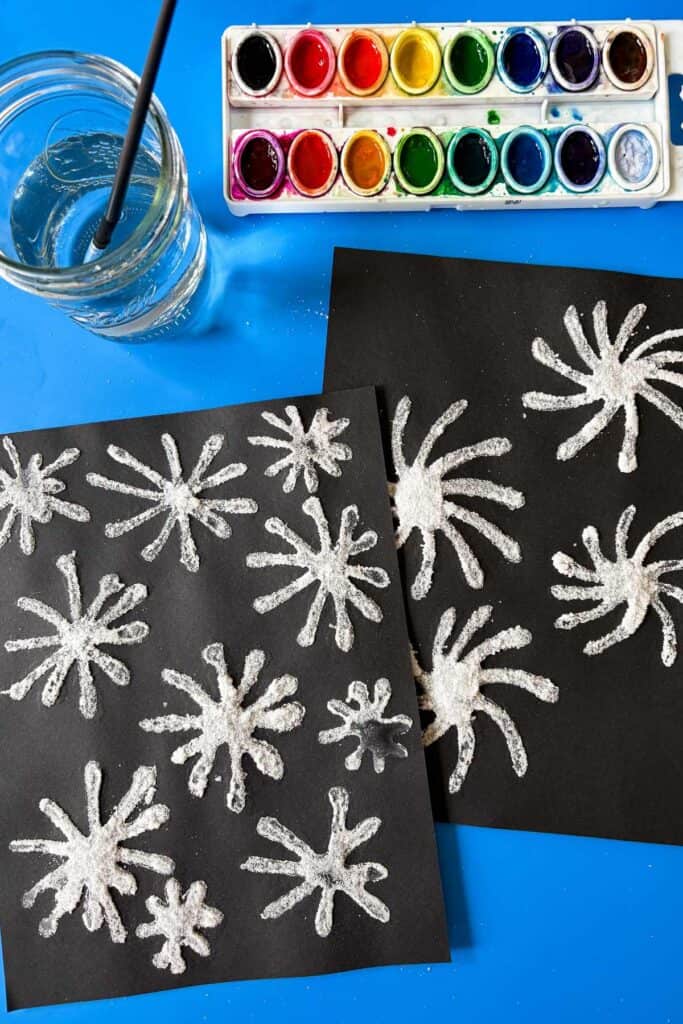
Step 1: Draw your firework shapes with glue
Squeeze your white glue directly onto the black paper in firework shapes. The trick is to think of each firework as a series of lines radiating out from a center point.
A great way to build the shape: draw an X first, then add a straight horizontal line and a vertical line right on top of it. What you end up with looks a bit like a snowflake and it reads perfectly as a firework burst. Make the lines as long or as short as you like.
You can even add little dots at the tips of the lines for that classic firework spark effect.
Don’t overthink it! Fireworks are naturally irregular and starburst-like, so there’s really no wrong way to do this. Fill your paper with several different firework shapes at different sizes for a full night-sky effect.
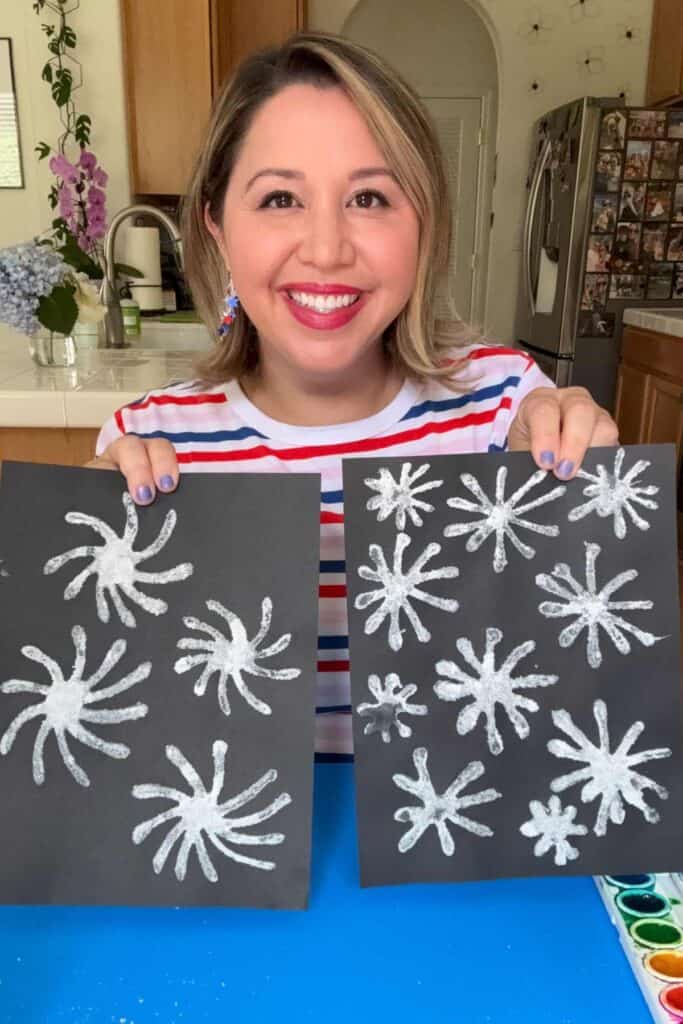
Step 2: Cover with salt
While the glue is still wet, pour a generous amount of table salt all over your paper, making sure every glue line is well covered.
Pick up the paper and gently shake or tap off all the excess salt over your tray.
Set the paper flat and let it dry completely. This step is important because if the glue is still wet when you add watercolor, the colors will bleed into each other and lose that satisfying firework burst effect.
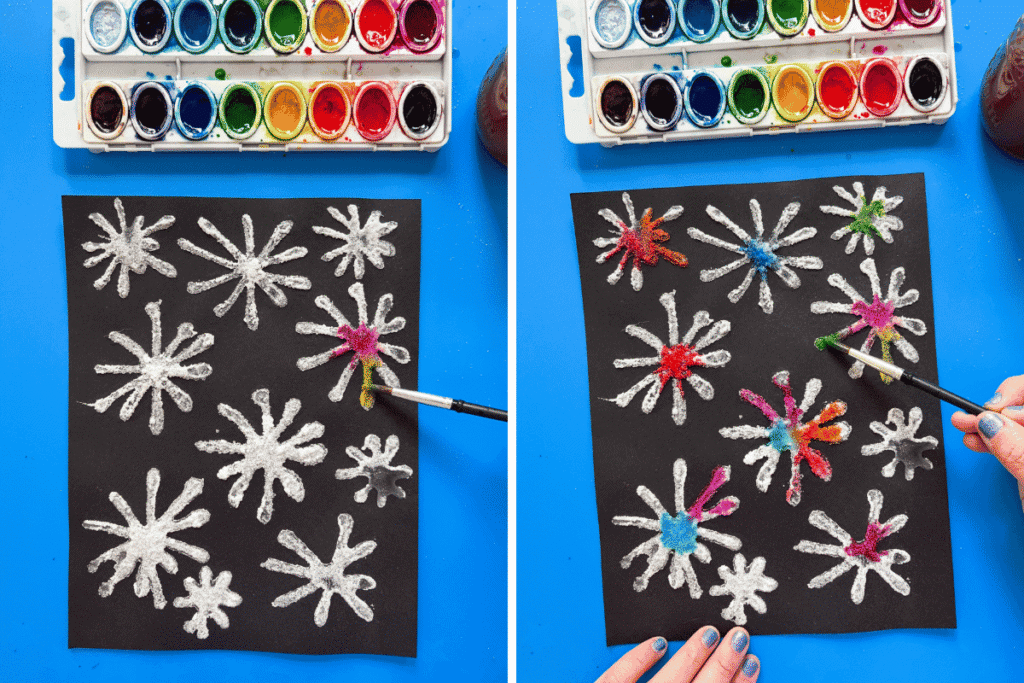
Step 3: Load up your watercolors
Once your salt fireworks are fully dry, it’s time for the most satisfying part. Get your watercolor paints really moist (I like add water to my watercolors 10ish minutes before I use them so that they can soften up).
Load your brush with plenty of water, then pick up just a small amount of the watercolor on the tip.
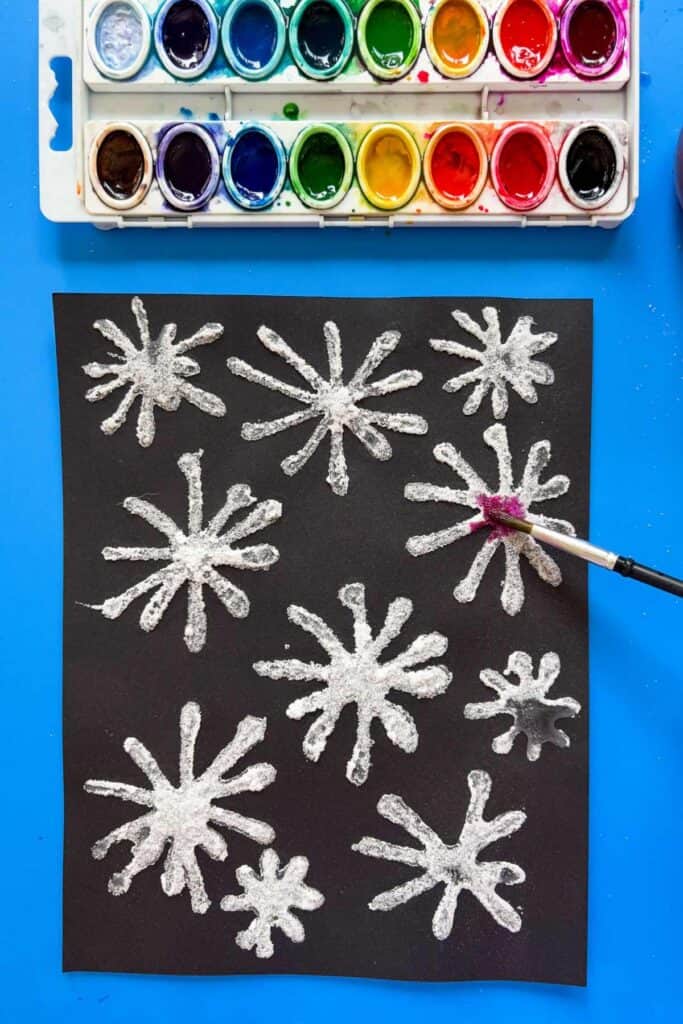
Step 4: Tap and watch the magic happen
Hold your loaded brush close to a salt firework shape and gently touch it to the salt.
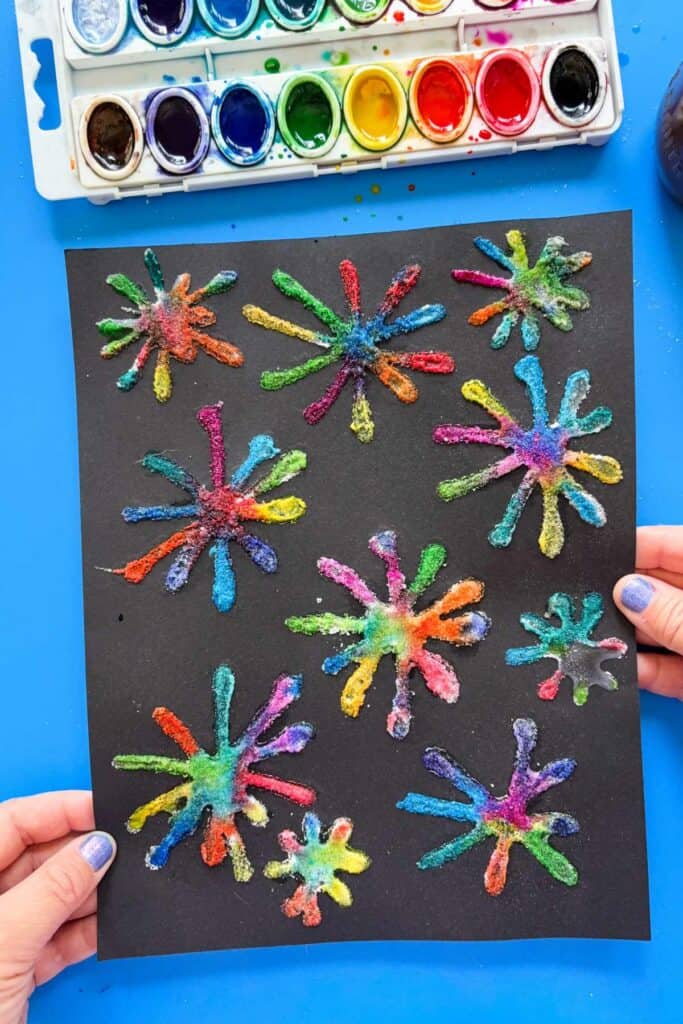
Watch what happens. The color will spread and travel along the salt crystals, diffusing outward from the drop in a perfect burst. It looks exactly like a firework exploding in slow motion. The salt pulls the color along the glue lines you drew, so the watercolor naturally follows the shape of your firework.
Fill in with lots of color!
Tips for the best results for this Fourth of July craft
- More water = more spread. If you want the color to travel further along the salt, add more water to your brush. Less water keeps the color more concentrated.
- Layer colors for depth. Try tapping a bright color first, then adding a second tap of a darker shade right at the center once the first has spread.
- Black cardstock > construction paper. The heavier the paper, the less it will warp from the water. Cardstock holds up much better and makes the colors pop.
Why this Fourth of July craft works so well
Beyond being genuinely fun to make, salt fireworks are one of those rare crafts where the process is the whole point.
The unpredictability of where the color travels, how it blooms and bleeds along the salt, and how it’s different every single time.
You’re not just painting a picture; you’re watching a little chemical reaction happen in real time.
Hang them in a window to let the light catch all those salt crystals, and they’ll sparkle just like the real thing.
Happy Fourth! 🎆
Frequently Asked Questions
As always, use what you’ve got! Just know the thicker the paper, the better it will hold up to the weight of the glue, salt, water, and paint.
I would leave it to dry overnight.
he most common culprit is not enough water on the brush. The brush needs to be quite wet — more water than you’d typically use for painting — so the drop is fluid enough to travel through the salt crystals. Also make sure your paints are moist and activated; dry, chalky paint won’t flow well.


LEAVE A COMMENT